

Warping Your Mini Loom
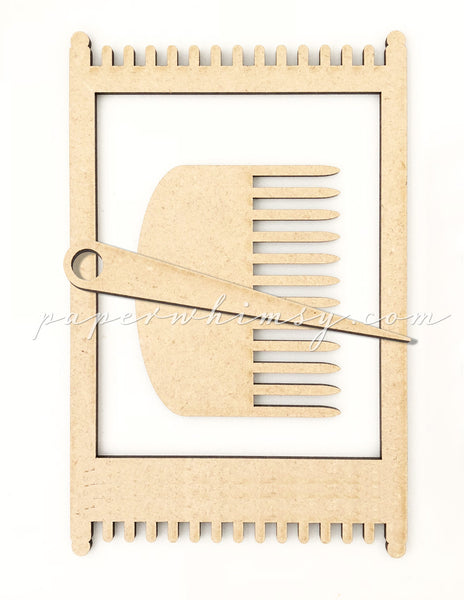
It's very easy to warp our mini tapestry loom. Please refer to the diagram and photos, below, to assist you.

You will warp the loom by looping your warp fiber around the small prongs as shown above. (You'll note that the bottom of the loom is thicker than the top.) Pull your warp fiber fairly taut but do not pull too energetically as to break the prongs or the loom.
You can warp the full width of the loom or you can make your weaving narrower by warping the width you would like your weaving to be.
I wrap the first warp around the top of the loom and tie it to the side. When I've finished warping my loom I tie it off the same way on the opposite side.

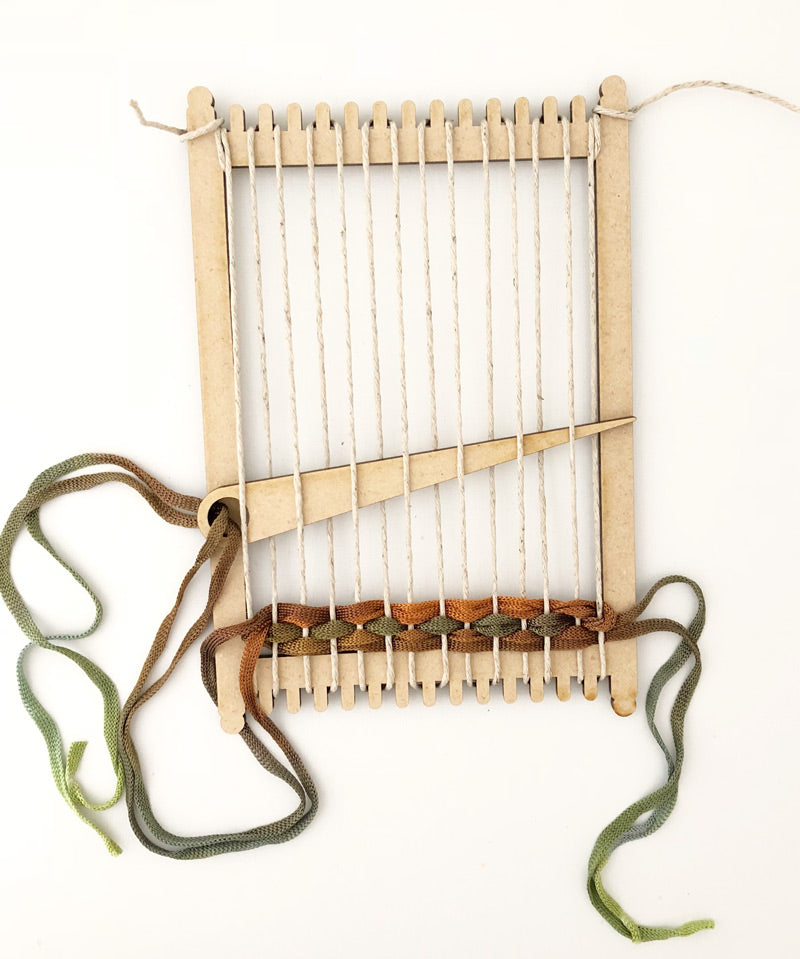
This is how your warped loom should look from the front and the back.
I used a 20# hemp cord when I warped this top example. Hemp works great as it is sturdy and does not stretch when you're warping and pulling the hemp taut.
You can also use a 10# hemp cord which is finer, just use a double strand, as shown below. Any sturdy thin cord that does not stretch should work for your warp thread.

When you weave your fibers through the warp you will use an under/over weaving style. First row will be under/over, second row will be over/under, alternating each subsequent row. Use the small comb to gently tamp down your weft as you weave so the woven rows fit together snuggly.

When I start weaving I always leave a length of an extra 3" or so of fiber which I will then weave into the back once I've finished the project. As you change yarns/fibers in your project, leave an extra few inches so you can weave them into the back of your weaving when you're finished. Or if you change fibers/yarns midway through a row you can also leave the extra length of fibers hanging to the front of your weaving for added interest.
On my sample project I kept the extra lengths of fibers quite long and then created a small tassel effect by pulling the fibers together, wrapping a bit of yarn around the top and letting these long ends dangle below the weaving. We're having FUN so just improvise. There are no strict rules in weaving a fiber tapestry such as this.
When you're finished with your weaving turn the loom over so the back of your weaving is facing you and clip the bottom weft threads where they loop around the prongs. Lift your weaving off the loom, carefully. To keep the weaving from unraveling you can either knot the loose warp threads at the bottom of your weaving or you can use a glue gun, fabric glue or tiny stitches to secure them to the bottom few rows of your weaving. You could also weave them back up into the weaving and then secure with glue.
To finish the top of your weaving slide a thin dowel or tiny branch through the loops of the weft at the top so you can hang your weaving and it remains flat.

A tip when weaving - don't pull too tightly on the weft which will pull in the outermost warp threads. You want the edges of your finished weaving to be straight. Pull your weft through carefully to keep your edges straight and tamp down your weft with the comb throughout your project.
The silk cocoon I used as a vase is something I picked up in England. I have found similar along with many rovings and fibers, available on Amazon. If you purchase the natural color cocoons you can dye them with watercolor or diluted ink. Another fun addition to your project.
Fibers, yarns, ribbons, lace, string, even paper, can be incorporated in your weaving. The first few rows of my weaving I cut strips from dried mulberry bark and wove them into my project (you can find mulberry bark along with a host of other wonderful yarns and fibers on Etsy).
Cheers!
Visit Pinterest for oodles of weaving inspiration. A search for "small weavings" or "fiber weavings" will get you started.
-
Gale Blair